Installing AlphaTrack

If you determined in step one that your previous installation was build 5.0 or 5.1, you may want to contact AlphaCard for a link to download build 5.2, which may be provided upon verification of your customer account. This must be installed on a Local Machine, not on a Server for distribution to Client machines. To avoid future permission issues, you should be logged on with Local Machine admin permissions when you install.
First, copy the backed up copy of the Company Setup file to the target computer.
- 1. For AlphaTrack Standard, this must be the same filepath/name as on the existing computer: C:\Program Files (or Program Files (x86) when an option) \Alpha Card Systems\Alpha Track\Sample Companies\Sample Company.jlt. You will need to copy to replace this file on the target computer.
For AlphaTrack Pro or Enterprise, if the Company setup file is on a shared network accessible by the target computer, no transfer will be necessary, but you will need to relink the Company Setup file as shown in step 2 of page 2 (clicking on the Manage button) to configure the software on the target computer.
- Otherwise, it can be pasted to same default location with the same filename to be accessed automatically by the software when launched. Alternatively, it can be pasted to any location accessible by the target computer and linked to after launching the software.
Then, copy the backed up copy of the Visitor Group database(s) to the target computer. Regardless of the version of AlphaTrack, these files can be pasted to almost any location accessible by the target computer. As it will be unlikely that the folder and file paths will be duplicated exactly on the target computer, it's easiest to assume that you will be re-linking the Visitor Group(s) to the new database locations after launching the AlphaTrack software.
Next, copy the Workstation Settings file to the target computer. Regardless of the version of AlphaTrack, this must be copied to replace the existing jollyLocalApplicationData.dat file at C:\Program Files\Alpha Card Systems\Alpha Track\Application Data from the existing computer exactly.
Launch AlphaTrack on the target computer.
- Select English or Spanish and choose Next
- Select Next to Install a new license

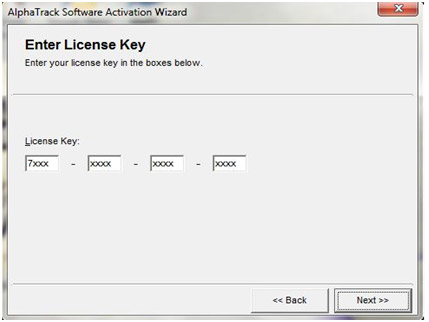
- Install the 12 digit License Key (Product Key) determined in step 1 and click Next
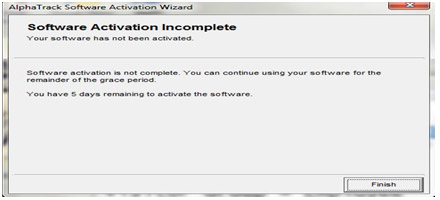
- Choose to Activate Later

- The next screen will report the number of days remaining before activation is required
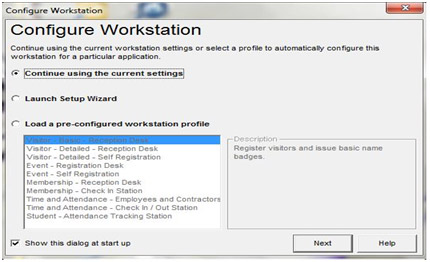
- Choose to Continue using the current settings
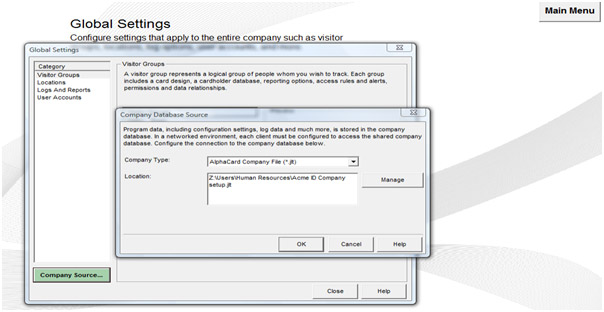
Relink AlphaTrack to the backed up and transferred copy of of the Company Setup (.jlt extension) file. For AlphaTrack Standard, this was done if the file was backed up and transferred correctly per step 8. For the Professional and Enterprise versions, you will need to navigate to Main Menu/Setup/Company Source and click on Manage to browse to the filepath/name of the correct Company Setup file.
Then, relink the Visitor Group(s) to their associated database(s).
- In the example below, in the Main Menu, the Visitor Group “Employees” is selected, and since this Visitor Group is linked to the Sample Database, no error is thrown, whether it's the Sample Database that was freshly installed on the target computer or the Sample Database transferred over from previous computer. The end user will need to verify if the data is correct by opening the Record Center for that Visitor Group.

- In the example below, this Visitor Group was linked to the Visitors.mdb file located at C:\Users\Owner\Documents\ATrack ID Dbs on the previous computer which filepath was not duplicated on the target computer.
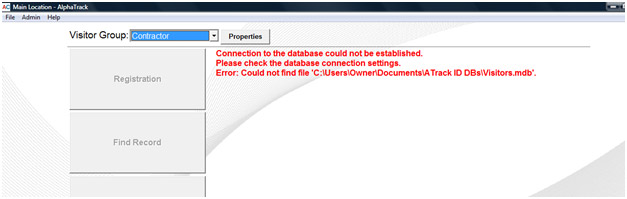
- To relink a Visitor Group to the correct database, click on the Properties button and then the Visitor Database Button. Browse to the filepath/name that you transferred the associated database to. Choose the appropriate Table and Primary Key and click OK. Choose Yes to save the database settings, No to save the Record Layout, Yes to re-mapping key-fields, and OK. This will need to be done with each Visitor Group.

Relink Photo objects to Image folder. If you determined that your photos are stored outside of the database in a separate folder, you will most likely have to recreate this image path.
- 1. In the Main Menu, select the Visitor Group and click on Properties. Click on the Badge Printing tab, the Edit button, and the Yes button to continue launching the AlphaCard Designer. Open the properties for the Photo object by double-clicking (or right-click and choose properties) on it. Highlight the existing folder path (only) and replace it by clicking on the Insert Folder Path and browsing to the new Photo folder.

Verify with the end user that all Visitor Groups are showing in the Main Menu drop down and that all records and photos are showing correctly in the Record Center for each group.
Go to step three: Deactivate the License on the Existing Computer. You may also download a PDF version of this guide: AlphaTrack Migration Instructions (PDF)
